
Thule Roof Box and Roof Rack Review

Hello and welcome to the Thule Cargo Box and roof rack rail review and accessories guide!
When you start researching roof boxes online It’s easy to get overwhelmed, especially if don’t have a solid understanding of what your options are. Here are a few determining factors that I used to narrow down my options before I bought my Thule Roof Box.
Compatibility - Determining which models will actually fit on you car.
Size - You want to make sure the gear you plan to transport will actually fit inside the cargo box.
Reliability - How well it holds up to abuse over time.
User friendliness.
In that fourth section I’ll also provide my opinion on all the features I like and don’t like etc. Don't get me wrong, I know there are many more factors that you can use to narrow down the pool and I promise that I will get into more specific features later on but I’d argue that by focusing on these four things first, you will eliminate most of the available options before you even start to look at roof boxes.
Compatibility
I’m gonna go out on a limb here and assume that if you're watching this video, you probably own a car, or at least have access to one. When you start researching roof boxes online you will quickly notice that there are two main popular brands, Thule and Yakima. You can find online questionnaires for both Thule and Yakima, similar to the “pack-finder” feature on the Osprey website that I demoed in my daypack video review of my trusty Deuter Airlite 22, where you can plug-in the make and model of your car and it will list all of the models that are compatible with your car.
Size
Now let’s talk about size. Cuz size matters, right?
Going into the initial research process I knew that I wanted the largest possible cargo box that could fit on my car. At the time I was writing freelance gear reviews for another website, while I was living in Hell’s Kitchen, in the heart of New York City. Now New York is not exactly the first place that comes to mind when you're trying to come up with ideal testing grounds for outdoor gear. I’d constantly have to get up super early, cram all the ski helmets or whatever I was reviewing at the time into my small four-door sedan, along with all the other gear that I typically use for that activity (like skis, boots etc). Then I would drive for three or four hours to an appropriate testing ground.
There were a few issues with this process, the first was obviously space. Even if your car has the option to fold down the rear seats so you can transport things like skis and snowboards, after you’ve packed up your skis, boots etc. into a small sedan like mine, there really isn't much room for ten to twenty helmets in boxes, especially when I would recruit someone else to help with the testing and we’d have to fit all of their stuff in the car as well. The second issue was just the risk associated with keeping lots of brand new gear exposed in my car. I’d try to fit everything in my trunk but when I couldn't, I’d resort to covering equipment with drop cloths or tarps to avoid attracting the attention of would-be thieves. The bottom line is that I needed more space in my car, I didn't want to spend money on a new larger car, so I looked into alternatives.
When my brothers and I were growing up and our parents would take us on vacation, the six of us would all pile into the family’s Chevy Suburban along with a ton of luggage and our two, rather large dogs. We could barely fit, even in a car as large as a Suburban, so over the years my parents owned a series of Thule roof boxes in which we would try to shove all of our skis, snowshoes and whatever else we could fit. Having had experience with the Thule brand in the past, I decided that those kinds of cargo boxes would act as a reasonable alternative to investing in a whole new car, which wasn't really even an option in the first place, so yeah... Just be sure to take a second to measure your skis, or whatever you plan to transport, before you buy a roof box. Knowing that my skis are 179 centimeters long, I just needed to make sure that the box was longer than that.
It’s actually shocking how much gear I can fit into this box when I take the time to be organized about it. An organized person could easily live out of one of these things. However, at the end of a long day on the mountain I prefer to just throw everything in there, slam it shut and make a beeline for the après ski, a sound method when I am all by myself. When I’m with friends or family however, more often then not, I have to force myself up onto a tire, so I can rearrange everything until it fits. Even though my Thule rooftop cargo carrier box is an “extra large” model, there is a fairly significant vertical limit to what can fit inside. Sure if I just have my skis, poles and a pair of snowshoes with me I can usually just toss all of that stuff in the box without looking and close it with out a problem, but even something as seemingly insignificant as my wife’s snowboard takes up enough space to force me to take a second to rearrange things.
When you open one of these boxes for the first time, you will notice that the pivot mechanism that holds the box open is exposed on the inside.

The lid will not close properly if something gets in the way of this mechanism. Make sure that the skis or whatever you plan to transport fits not only within the dimensions of the Thule Box itself, it must also fit between the front and rear hinges on the inside of the cargo box.
And please, for the love of all that is good and green in this world, do not try to force the lid down over something that is too tall or in the way of the hinge. These cargo boxes are like the Death Star, tough on the outside but vulnerable on the inside. They are not indestructible, especially the mechanism inside, which is probably the weakest link in the cargo-box that, if damaged, could potentially render the entire box unusable.
Note:
If you plan to transport more bulky items, like coolers or suitcases, that don’t lay quite as flat as a pair of skis, I’d suggest that you look into “Hitch Boxes” that attach to the rear of your car, as opposed to the rooftop cargo boxes designed to carry the longer, more slender items.
Reliability
This, of course, brings us to reliability. As I mentioned earlier, Thule and Yakima dominate this market.
I went with Thule for a couple reasons. First, I know more people that own them who gave me positive feedback and second, the model I got (Force XL Cargo Box) had the best cost to capacity ratio I could find at the time. Unfortunately the Force XL model has since been discontinued, but the new version, the Force XT XL has all of the same features in addition to bing slightly larger on the inside (and is therefore better in my opinion).
Normally, when buying something that is marketed for a certain purpose, like say holding a bunch of heavy shit to the roof of your car while driving at highway speeds, for example, it is easy to assume that the product does what it says it will. Sadly, that is not always the case. Once, for example, one of the older Thule models flew off the top of my mom’s car while she was driving on the highway. Luckily no one was hurt. It’s unclear if the clamp failed, if the box was not secured properly in the first place, or if the lid hadn’t been closed all the way but the point is that sometimes shit just happens and it is nice to know that at least part of your several hundred dollar investment into a product went into the development of features that mitigate the volume of potential shit-happenings one might encounter when using said product. Typically accidents only happen when people fail to follow instructions properly, but it is nice to know that your roof box has your back even if, like me, you tend to screw up once in a while. Personally I’ve never had an issue with my Thule’s ability to stay on my car’s roof (and I tend to pack it to the gills) but it is a newer model with newer features that I’ll cover in the next section.
So, if you are on a tight budget just make sure to do a good amount of research before jumping into bed with a lesser-known brand.
user friendliness
Alright, Next up, User Friendliness! This is one of those categories that often tends to offset the more objective data that comes out of comparing things like specs and price. Some gear looks a lot better on paper than it does in real life. I have found this especially true with more complicated techie gear like smartwatches and cameras to name a couple examples, but in this case, rooftop boxes are simple enough for someone to get a pretty accurate picture from just the specs.
The first feature I want to highlight is the weight of the cargo box.
In spite of its massive size, the Thule Force XL Roof Box is shockingly lightweight and well-balanced, so much so that I can easily lift and place it on top of my car by myself if there is no one around to help me.
The second feature I’d like to highlight is the EXTREMELY easy-to-use clamping mechanism that attaches the cargo box to the rails on the roof of your car. All four clamps can slide back and forth making it super easy to properly position the box on top of your car before tightening the clamps with these simple knobs. I don’t even know how they work but once you tighten them, the thing will not budge.
The next feature I want to discuss absolutely blew my mind when I learned of its existence, and that is the ability to open the box from either side of the car. After learning a box could do that, there was no way I was getting one that couldn’t. It is hands down my favorite feature and most definitely ranks as one of the top features that contribute to my positive user experience.
The box has a few other nice features. for one, Thule includes some nylon straps that can be used to tie down your gear inside the box to prevent it from sliding around while you are driving, but more important than that is that you cannot physically remove the key from the keyhole in the lock until the lid is shut and the lock is properly engaged. This ties back into what I mentioned earlier about mitigating the risk associated with transporting heavy goods on the roof of your car at highway speeds. Everyone knows someone who at some point in their lives, placed something important on the roof of their car, forgot about it, got in and drove away never to see that important thing again. BUT NO LONGER! If, like me, you decide to keep the key to your Thule on the same keychain as the key to your car, there is no chance you will ever accidentally drive away before you close the lid. It also reduces the risk of losing the key and prevents you from accidentally locking it inside the box. Some car companies haven’t even figured out how to prevent that from happening!
Anyway. Whoever came up with that, thanks for lookin’ out. Much appreciated.
Didn’t even know it was a thing, but now I love it.
BONUS TIP
Don’t put your ski or snowboard boots in the roof box. First, boots take up precious vertical space that should be dedicated to the sharp, pokey things that you don't want inside the car like boards, poles, skis, snowshoes etc. Second, these boxes are not insulated so if you leave your boots in there before you get to the mountain, you are pretty much guaranteed to spend the day with cold feet (actual cold feet, not backing-out-of-something-out-of-fear cold feet). Come to think of it, I rarely keep my ski boots in my car at all. Just the simple act of bringing them indoors overnight makes a huge difference. Nobody wants to start off the day with cold boots.
Accessories

Thule EVO Wingbar Rails, the EVO Raised Rail Foot Pack of Clamps and the Thule Core Locks
So now I want to talk a bit about accessories, because there are some important ones that you’ll definitely wanna know about. At this point in the video you might be wondering how you’re gonna clamp the damn thing to your roof, which is a legitimate concern. Thule does make their own proprietary rails that clamp onto bald roofs somehow but because I don’t trust witchcraft I ordered my first pair of roof rails through Subaru figuring that, compared to Thule, they’d have a better idea of how to attach things to their own cars.
Storytime…
My car has a manual transmission. This was a great feature to have in college for a number of reasons but mainly because no one ever asked to borrow my car. The other side of that coin is that I had to do all the driving anytime we used it for a road trip. Predictably, or unpredictably depending on how you think about it, married life now comes with some of the same pitfalls of college life. In this case it means that we have to take my wife’s car anytime we go anywhere together (especially Après Ski, cuz I can’t drive home from those), and of course, even though her car came with roof rails, the rails run in the wrong direction for the clamps on my Thule roof box.
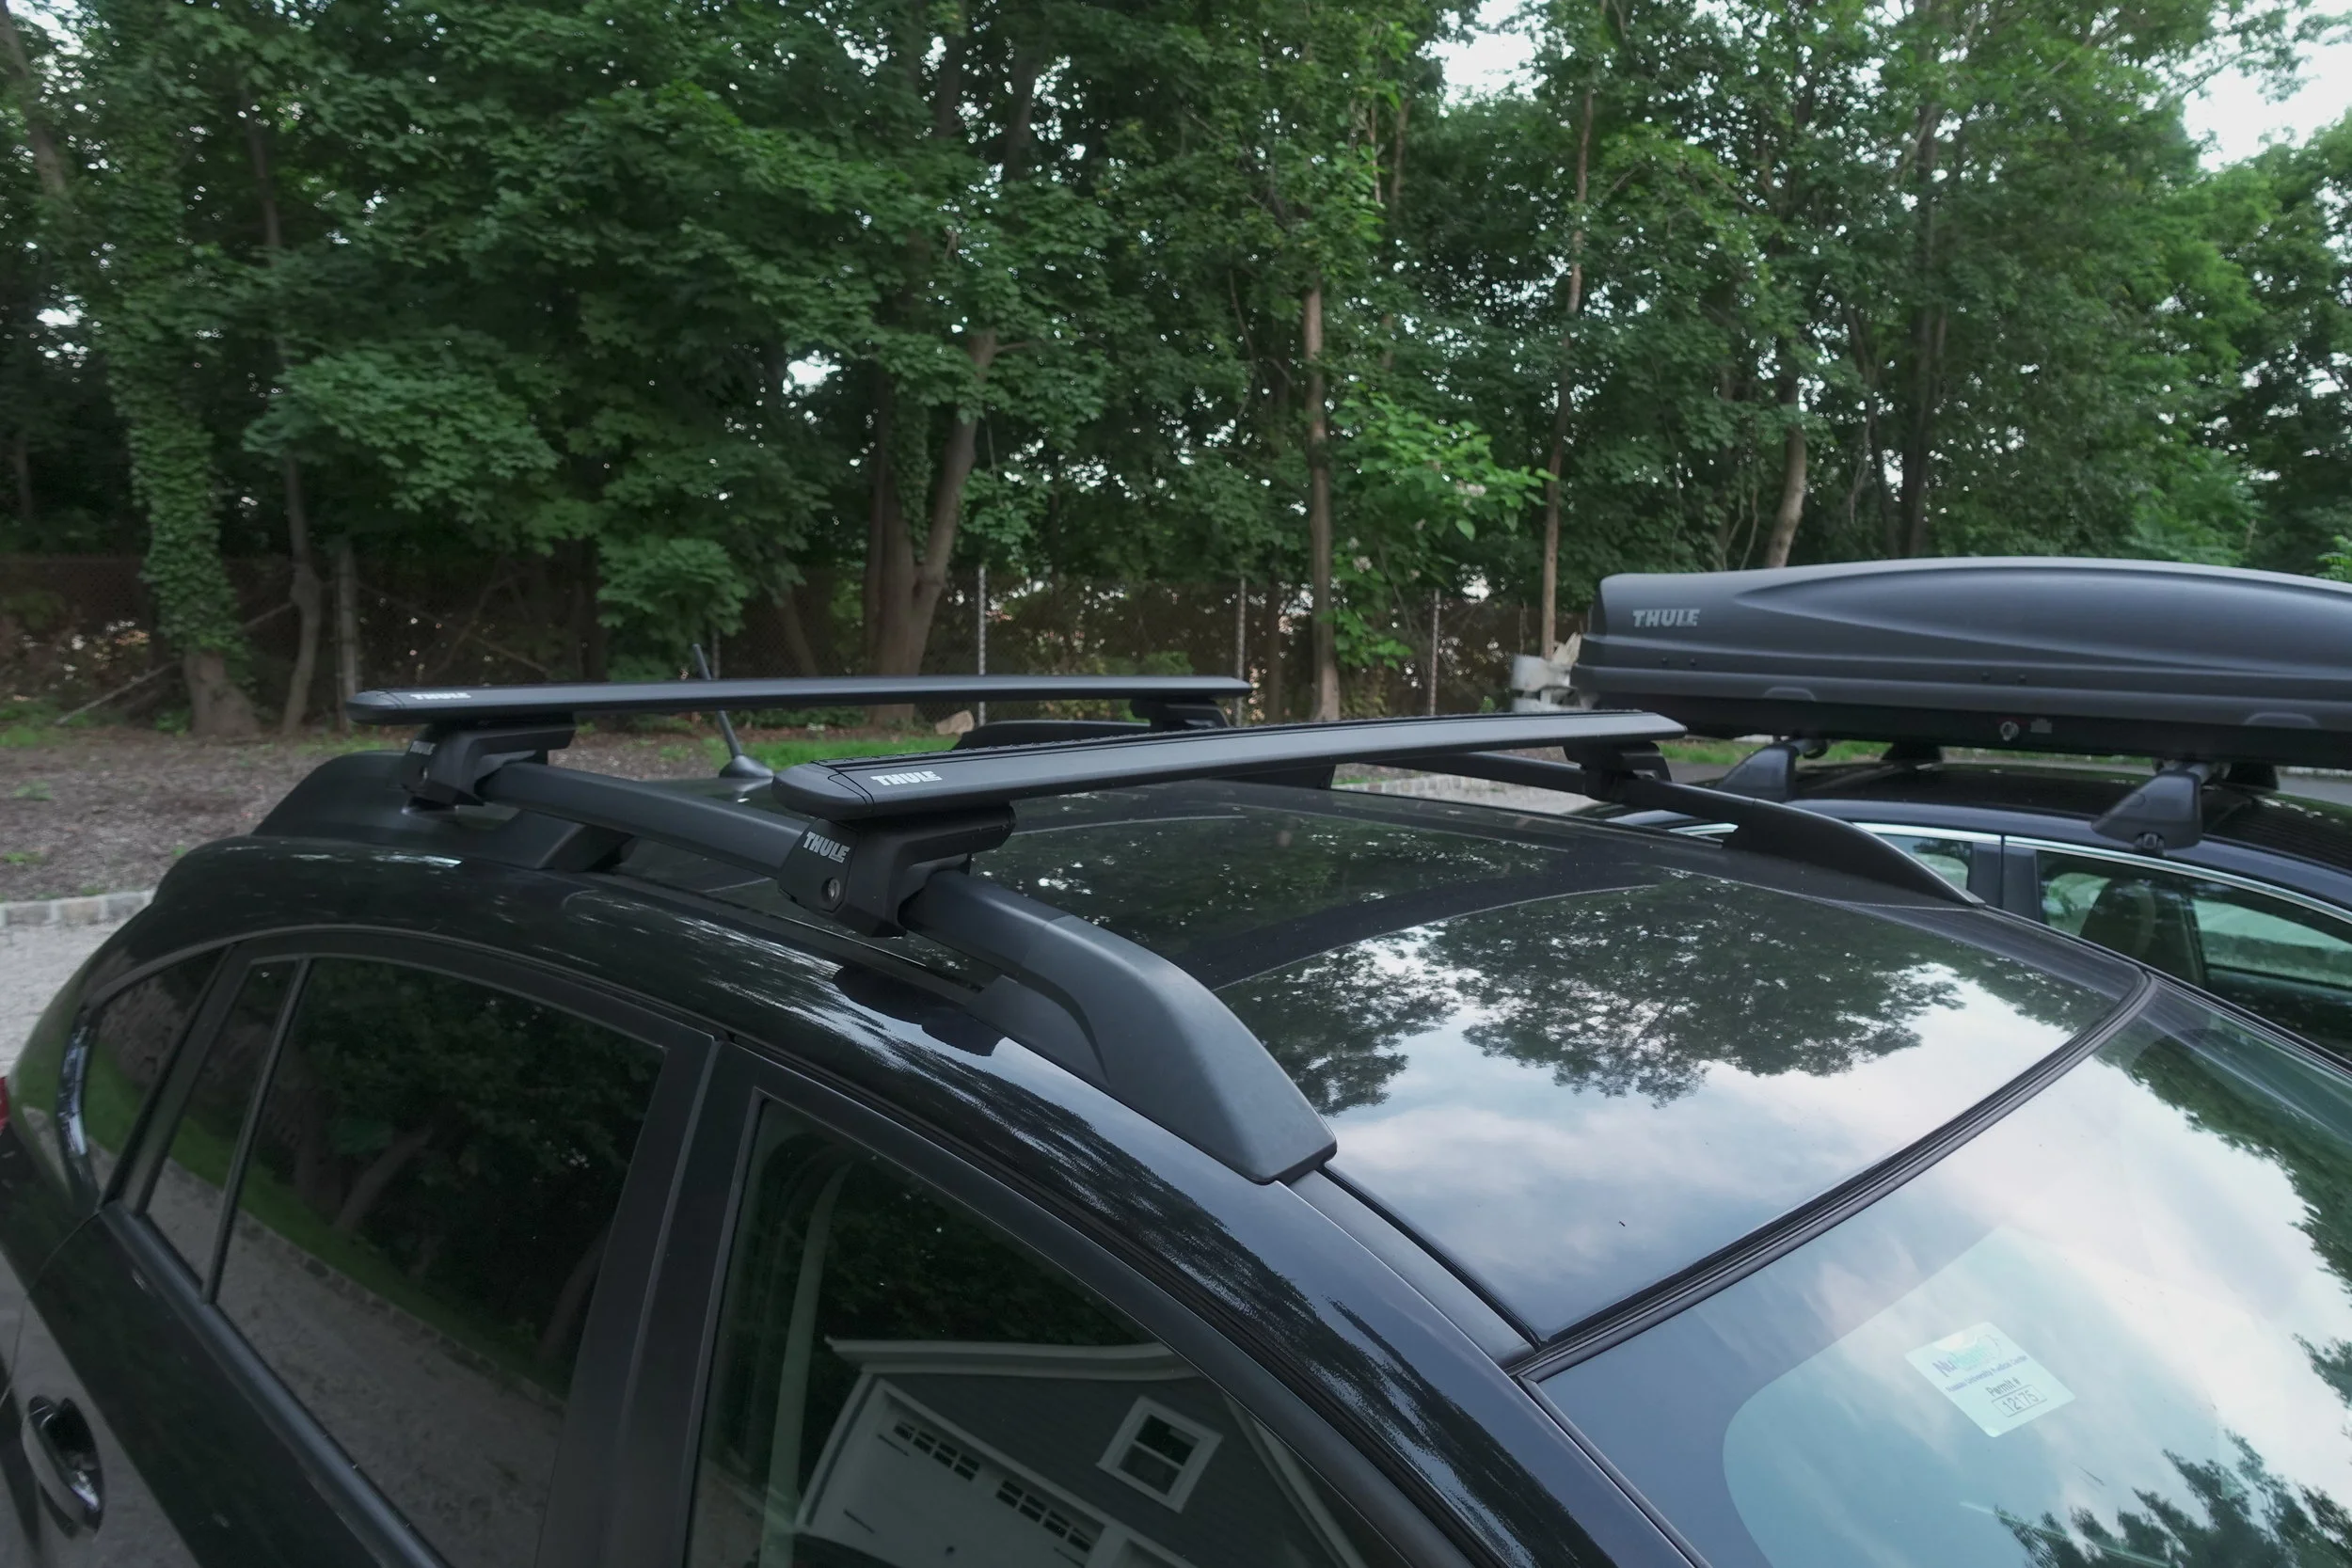
If your car has rails like this (running front-to back) you’re actually in luck because Thule smartly makes and sells exactly what you need to remedy this issue, and it actually involves a lot less BS than I had to deal with getting the other rails installed on my car. In this case I was able to do it myself without much difficulty. And believe me, if I can figure it out, you can definitely figure it out. If your car has wrong-way rails, as I like to call them, and you want to put one of these boxes on your roof, Thule makes two things you’ll definitely need and one more thing that you’ll probably need as well.
The first thing you have to ask yourself is “do I want to shell out the cash for the awesome looking, air-slicing Thule Wingbar EVO Rails? Or do I want to save money and go for the more affordable, boring, square, but probably just as functional rails?”
But wait there’s more!
If you thought you could get away with just buying the rails, you're dead wrong, because you also need the special foot pack of clamps that allows you to mount them onto the wrong-way rails. Only once I got all that crap on the roof of my wife’s car, could I easily move the Thule between the two cars.

And you’d think it'd be over there, but NOPE, WRONG AGAIN!
You might have noticed these little holes here…
Well these holes happen to be the holes that allow you to bolt and unbolt the clamps to the wrong-way rails, so if you don’t shell out a bit more of your hard earned cash for these handy dandy proprietary Thule core locks, technically, even though someone might not have the key to your box, they could just use an Allen key to unbolt the whole rail foot pack system and run away with it. Kinda like in those heist movies where they’re trying to rack the safe but the po-pos are coming and they're running out of time, so they panic and they're just like f*&^ it, just take the whole safe and well open it later.
And that is pretty much my whole Thule Rooftop Cargo Box and accessories set up.
And just in case I wasn’t clear on this, I got the Subaru rails and the actual box back in 2017, but I only bought the other EVO wingbar rails, the locks and the EVO foot pack this past February before my wife and I drove her car up to Stowe to do some skiing on presidents day weekend.
So yeah, I know that it all adds up to a pretty significant investment. And I just wanted you to know that I definitely did not buy all this stuff at once and you shouldn’t have to either, especially if you only need to mount the box on top of one car.
So there you have it folks!
I want to wish a very warm welcome to those of you who are new to the FinerBub Gear Blog. If this is the first review of mine that you’ve seen, I just wanna let you know that I also make travel guides in addition to product reviews like this.
Got a lot of good stuff coming up from my adventures in Costa Rica so if you're interested in that be sure to subscribe to my Youtube channel or my email list below so you know when that comes out.
See you out there.
Peace.